It took me quite a while to get the right certificate and to remember the steps,therefore, I am blogging it here for my future reference and also for some of us out there who may need this.
This blog is useful for you if you are about to create a certificate for your VPN using Layer 2 Tunneling Protocol with IPSec (L2TP/IPSec) that to be use with Microsoft Forefront Threat Management Gateway (TMG) 2010.
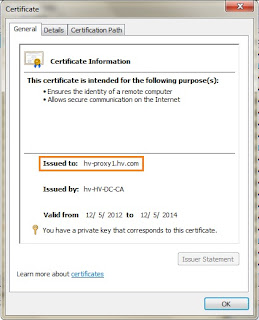
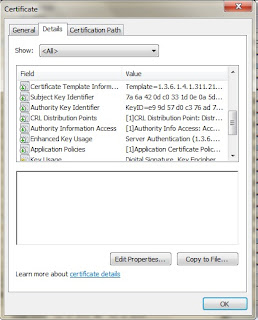
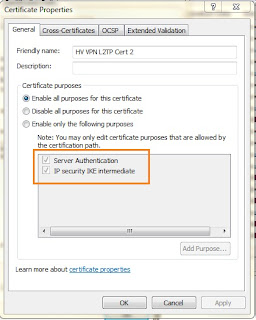
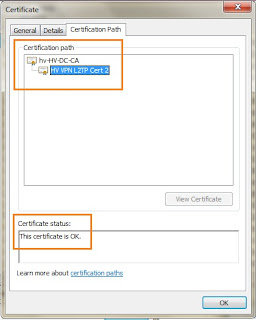
Ultimately, you have to create a certificate as shown below, with the highlighted attributes being the most critical:-
 |
| Use VPN server's FQDN as the certificate CN |
 |
| Entensions that are important |
 |
| Both Server 'Authentication' and 'IP Security IKE intermediate' are must included |
 |
| Both Digital 'Signature' and 'Key Encipherment' must be available |
 |
| Make sure the certificate path is not broken |
How to create L2TP/IPsec Certificate for TMG 2010
This blog assume that a CA is deployed and is running. the first thing to do is to log on to the CA server and bring up the Server Manager (I am using Windows Server 2008 R2) and select Roles-> Certification Authority
1. On then CA Server, click Certificate Templates
2. Right click on the IPSec (Offline Request), select Duplicate Template
3. On the General page, type HV VPN L2TP IPSec 2 in the Template display name
4. You might change the Validity period to 5 years or longer.
5. Select Request Handling tab, set a checkmark in Allow private key to be exported
6. Click CSPs…, and select Requests can use any CSP available on the subject’s computer, click Ok
7. Select Extensions tab. Change the highlighted in accordance
8. Click Ok
9. Expand <Enterprise Root CA Name>
10. Right click Certificate Templates, select New, click Certificate Template to Issue
11. On the Enable Certificate Templates page select HV VPN L2TP IPSec 2 on the list and click Ok
How to request a L2TP/IPsec Certificate for TMG 2010
1. On the TMG 2010 Server (HV-PROXY1.hv.com)
2. Open Internet Explorer and browse to https://hv-dc.hv.com/Certsrv (my CA server)
3. Select Request a certificate
4. Select Advanced certificate request
5. Select Create and submit a request to this CA
6. In the Certificate Template, select HV VPN L2TP IPSec 2
7. Put a checkmark in Store certificate in the local computer certificate store
8. Click Submit
9. Click Yes to the Potential Scripting Violation box
10. Click Install this certificate
11. Click Yes to the Potential Scripting Violation box
12. Use MMC with Certificates plugin and locate the certificate at User Certificate Store->Personal
13. Right click on the certificate you just created, select All Tasks, select Export
14. On the Welcome to the Certificate Export Wizard page, click Next
15. On the Export Private Key page, select Yes, export the private key, click Next
16. On the Export file format page, leave the default and click Next
17. On the Password page, type a Password for the certificate, click Next
18. On the File to Export page, type a name for the certificate e.g. c:\Applications\Cert\HV VPN L2TP IPSec 2.pfx, click Next
19. On the Completing the Certificate Export Wizard page, click Finish
20. Click Ok
How to import the certificate to TMG 2010
The certificate now is saved on a file HV VPN L2TP IPSec 2.pfx. You have to import this certificate to the TMG 2010 Personal Store.
1. On the TMG 2010 Server, expand Certificates (Local Computer
2. Right click Personal, select All Tasks, select Import
3. On the Welcome to the Certificate Import Wizard page, click Next
4. On the File to Import page, type c:\
Applications\Cert\HV VPN L2TP IPSec 2.pfx , click Next
5. On the Password page, type the Password for the certificate, click Next
6. On the Certificate Store page, select Place all certificates in the following store, and 7. select Personal, click Next
8. On the Completing the Certificate Import Wizard page, click Finish
9. Click Ok
How to import the certificate to the VPN Client
We are now half the way of the field. So far we have create and issued a custom certificate from Enterprise CA to the TMG 2010 server. It is now we have to tackle the VPN Client which may be non domain computer. And this leave us the hard way, install the certificate manually.
1. Save the HV VPN L2TP IPSec.pbx file to the non domain computer
2. On the non domain member computer copy the file HV VPN L2TP IPSec 2.pfx to a temporary directory.
3. Create a custom MMC for the Certificates
4. Click Start, click Run, type MMC, and then press Enter
5. Click File, and then click Add/Remove Snap in
6. Click Add, and then select Certificates from the list and click Add, select Computer
account, click Next, selectLocal computer, click Finish
7. Click Close, click Ok
8. Expand Certificates
9. Right click Personal, select All Tasks, select Import
10. On the Welcome to the Certificate Import Wizard page, click Next
11. On the File to Import page, type <dir>
HV VPN L2TP IPSec 2.pfx , click Next
12. On the Password page, type the Password for the certificate, click Next
13. On the Certificate Store page, select Place all certificates in the following store, and select Personal, clickNext
14. On the Completing the Certificate Import Wizard page, click Finish
15. Click Ok
The creation and assignment of the certificate which is require for L2TP/IPSec implementation is now completed. You may now proceed with the rest configuration of the VPN server and client access.


