Wednesday, November 21, 2012

SCSM 2012 Data Warehouse DWDataMart Full

Recently i nearly got myself into a dead lock where my SCSM 2012 Data Warehouse Management Server goes dead as the disk space use up by the DWDataMart Log.

Since the backup of the database failed weeks ago and unfortunately no one noticing it, the DB log file grows to 23GB and immediately flood out the hard drive.

I soon come to a very useful SQL command which can truncate the DB Log. Also not that by doing this, you lost the recovery option of that period, so do think twice before using this command.


BACKUP LOG DWDataMart TO DISK = N'e:DWDataMart.bak'
GO

DBCC SHRINKFILE('SM_LOG', 1)
GO

This is a simple command that safe my day. :-)

You can also apply this to clean up the DWRepository as well in case the log use up all the space.

Tuesday, November 20, 2012

SCSM 2012 Data Warehouse Cube Processing Keep Failing


I personally find it very annoying when you imported a management pack (MP) in your SCSM and the next day all Cube Processing job failed without reason.

Have been seeking high and low for fix this and finally with combine article from Technet and forums by hundreds miserable user same as myself, the cube processing can be fixed using below method

Firstly lets Disable Data Warehouse Cube Processing jobs via Power Shell (make sure to change to correct Program Files install directory for SCSM):

Import-Module '%ProgramFiles% \Microsoft System Center 2012\ServiceManager\Microsoft.EnterpriseManagement.Warehouse.Cmdlets.psd1'
Disable-SCDWJob "Process.SystemCenterConfigItemCube"
Disable-SCDWJob "Process.SystemCenterWorkItemsCube"
Disable-SCDWJob "ProGetcess.SystemCenterChangeAndActivityManagementCube"
Disable-SCDWJob "Process.SystemCenterServiceCatalogCube"
Disable-SCDWJob "Process.SystemCenterPowerManagementCube"
Disable-SCDWJob "Process.SystemCenterSoftwareUpdateCube"

Login to the server hosting the Analysis service and run the powershell script, just remember to change the$Server.Connect and the $DWASDB with the correct server (being the name of the SQL Server) and database name. It usually runs for 5-15 minutes. In my case, it took me about 45 minutes, so not to worry if the Powershell hung. When complete, you can verify by looking at the properties at one of the dimensions


[System.Reflection.Assembly]::LoadWithPartialName("Microsoft.AnalysisServices")
$Server = New-Object Microsoft.AnalysisServices.Server
$Server.Connect("serverdw.blog.com")
$Databases = $Server.Databases
$DWASDB = $Databases["DWASDataBase"]
$Dimensions = New-Object Microsoft.AnalysisServices.Dimension
$Dimensions = $DWASDB.Dimensions
foreach ($Dimension in $Dimensions){$Dimension.Process("ProcessFull")}


Now you have to enable back all the cube processing job you have disabled earlier.

Enable-SCDWJob "Process.SystemCenterConfigItemCube"
Enable-SCDWJob "Process.SystemCenterWorkItemsCube"
Enable-SCDWJob "ProGetcess.SystemCenterChangeAndActivityManagementCube"
Enable-SCDWJob "Process.SystemCenterServiceCatalogCube"
Enable-SCDWJob "Process.SystemCenterPowerManagementCube"
Enable-SCDWJob "Process.SystemCenterSoftwareUpdateCube"

The final step to do is to process all the cubes


Notice that the cube processing finish without error.

hope this help out all other out there with SCSM 2012 Cube Processing issue.


Thursday, October 25, 2012

Hyper-V 2012 : VLAN Trunking

During one of our Microsoft Hyper-V 2012 deployment (without GUI) on HP 160 G5, we have come across a very interesting finding of the built-in capabilities where you can now TRUNK VLAN without HP Network Configuration Utility (HPCU)

It was both the shock an excitement that night when both myself and Hafiz found that by adding a DWORD to the registry and a clean restart... VOILA ! the VLAN trunking works as expected.

This is the location to find for the registry key that you have to add.


HKEY_LOCAL_MACHINE\ControlSet001\Control\Class\{4d36e972-e325-11ce-bfc1-08002be10318}\00xx

xx could be any number so you must open each key and look for your network adapter. If you are using NIC Teaming you probably need to do this for both adapters or all adapters that set up your team, in case you have more than two.


So, what is so great about this ?

Remember back in Windows Server 2008 R2 SP1, you need to install HPCU (Not an option). After the installation, you have to use HPCU to create VLAN(802.1q) with the NIC port of you choice. 

And the next complication was that for each VLAN that you trunk, there will be additional Network Adapter create for that particular VLAN

Imaging you have 2 NIC ports and you have 5 VLANs that you need to trunk them for the VMs. This will gives you 10 extra Network Adapters show in Network Connections window. MESSY !!!

Now that we can do this without HPCU, you only need to specify the VLAN in the Virtual Network of the VM that want to connect to.

Tuesday, October 23, 2012

SCSM 2012 : Work Item Running Number


One counter for all types of work items:
For instance:

  • New Incident = IR1
  • New Change Request = CR2
  • Change Request contains 2 activities = RA3 and MA4
  • New Incident = IR5

and so on

All work items are sharing the same counter for ID. Only the prefix is added to this ID based on the work item class (IR, CR, PR, SR, MA, RA).
For this reason the ID is not increment uniformly for each type of work item.
This behavior can't be changed. 

However, you can set the starting number by changing a value in the database.

Basically there is this table in the ServiceManager database called the AutoIncrementAvailableRange table.  This value stores the next available number for a particular class property.  If the last work item ID that was handed out was 1234 this table would show 1235 and then once 1235 was used it would say 1236.  You get the idea.  So, by changing this number we can change the base number that we start from.  Let’s say for example that we always want our incident IDs to be in the 10,000+ range.  We could change thus number to 10000 and start from there.  Definitely don’t set it lower than the current number though!  That will most likely be very bad.

Use the SQL command below to set the new number you want
update AutoIncrementAvailableRange
set FirstAvailableValue = 10000 
where ManagedTypeId = 'F59821E2-0364-ED2C-19E3-752EFBB1ECE9' and ManagedTypePropertyId = '28B1C58F-AEFA-A449-7496-4805186BD94F'
Use the command below to check if the value changed to the one you set using command above
select
MT.TypeName,
MT.ManagedTypeId,
MTP.ManagedTypePropertyName,
MTP.ManagedTypePropertyID,
AIAR.FirstAvailableValue
from ManagedType as MT, ManagedTypeProperty as MTP, AutoIncrementAvailableRange as AIAR 
where MT.ManagedTypeId = AIAR.ManagedTypeId and MTP.ManagedTypePropertyId = AIAR.ManagedTypePropertyId
Notice that at the end of the role "System.WorkItem", at the "FirstAvailableValue" column, the number is the number you have set.


Saturday, July 28, 2012

Update Rollup 2 for SCSM 2012 released

It is available now for download. For those of you who having the following issues, please find yourself this update with this Rollup 2 release :-

  • The URL links to incidents or activities in the Notification Templates are incorrect. For more information about this issue, go to the following Microsoft TechNet website:
  • Including Links to Incidents or Activities in Notification Templates (SCSM 2012)
  • The time stamp for incidents that are created by using the SMTP connector are incorrect.
  • If you change the SharePoint site language in the Service Manager portal, an incorrect language may be displayed.
  • Service Manager does not generate an incident for alerts that are created by Operations Manager rules.
More information can be found at http://support.microsoft.com/kb/2706783.


Tuesday, May 22, 2012

Rapid VM deployment with Powershell on Hyper-V 3

I have conducted a web seminar for 'Microsoft Partner Readiness Webminar' Module 2a which focusing on working with Hyper-V 3 with Powershell.

In my first demo 'Demo1', I have showed to the audience on how we could rapidly deploy VMs Without the use of:-
1. Hyper-V Manager
2. System Center Virtual Machine Manager

The Power of Powershell in managing VMs in Hyper-V

Most of us thought that with the Hyper-V Manager, we could do most of the administrative tasks easily. Well, time to rethink if you have hundreds (if not thousands) of VMs running on you Hyper-V infrastructure and you have to do the following :-
1. To find out the Startup Memory, Minimum Memory and Maximum Memory each VM
2. To find out vCPU count of each VM
3. To find out the vSwitch and VLAN ID each VM connected
With the few tasks as listed, immediately we know how complicated things going to be, and a good example is that we have to right-click each and every VM, properties just to find out these information.

Let think this through with Powershell, you could simply use these to solve the tasks above :-
1. Get-VMMemory -VMNAME <vmname> | ft vmname, startupmemory, minimummemory, maximummemory
2. Get-VMProcessors -VMNAME <vmname> | ft vmname, count
3. Get-VMnetwork

How Aboout Bulk Creating VMs ?

Yes ! Of course we can do that, in fact there are numerous ways in getting this done. In this blog I am going to share with you how we pre-defined the VMs configuration in an CSV spreadsheet and then use powershell to created alll these VMs.

I have change the script I shared last at http://ariessysadmin.blogspot.com/2011/12/how-to-rapid-deploy-vm-using-powershell.html How-To: Rapid Deploy VM Using Powershell to the following

#BulkCreateVMs.ps1
$vmdefaultpath = "D:\VMs"
$ParentVHD = "D:\Hyper Base\WIN2K8R2SP1_Ent_Sysprep_180days_Updated20120404.vhd"
$path = "D:\vms\VMs.csv"
import-csv -path $path|ForEach-Object {
$erroractionpreference = 0    
$vmName = $_.Name
[int] $vmmemory = $_.Memory
$vmstartmemory=$vmmemory*1073741824
$vmcpucount = $_.Cpucount
$vmSwitch = $_.Network
$vmpath = $vmdefaultpath
#Create the VM
New-VM -Name $vmname -Path $vmdefaultpath
#Set the VM Memory properties
Set-VM -Name $vmname -StaticMemory -MemoryStartupBytes $vmstartmemory
#Set the vCPU
Set-VMProcessor -VMName $vmname -Count $vmcpucount
#Connect the VM to vSwitch
Connect-VMNetworkAdapter -VMName $vmname -SwitchName $vmSwitch
#Create VHD for the VM
New-VHD -Path $vmpath\$vmname\$vmname.vhd -ParentPath $ParentVHD
#Add the VHD to the VM to IDE 0 Location 0
Add-VMHardDiskDrive -vmname $vmname -ControllerType IDE -ControllerNumber 0 -Path $vmpath\$vmname\$vmname.vhd
Write-Host -BackgroundColor Green -ForegroundColor Black "Virtual Machine $vmname has been successfully created"     
}


The script above:-
1. Reads all VM configuration listed in VMs.csv and create in Hyper-V 3 host
2. Stores all VMs configuration files, snapshots, and VHDs in D:\VMs\
3. Creates diferrencing disk for each VMs with the Parent VHD in D:\Hyper Base\
4. Creates VMs with static memory


You have to change this script properties to suit your environment if you plan to use this.

Below is the video i have captured, showing how the script works for my demo.


Tuesday, May 15, 2012

Create VPN Connection in Windows 7

How to Create L2TP/IPSec VPN Connection in Windows 7


Before you could establish a L2TP/IPSec connection to VPN Server, it is important for you to check if the computer you are dialing does have all the necessary certificates. You may visit my blog Create L2TP/IPSec Certificate for TMG 2010 using Enterprise CA which I mentioned all the steps to import certificates from CA to your computer.

1. Right click on Network Connection at the task bar and select Open Network and Sharing Center

2. Select Connect to a Network. Click Next

3. Select Connect to a Workplace. Click Next

4. Select No, create a new connection. Click Next. (This only if you have other connection)

5. Select Use my Internet connection (VPN)

6. Type in the VPN server IP or FQDN
7. Give the connection a name
8. Check Don't connect now, just set it up so I can connect later. Click Next

9. Type in the credential. Click Finish

10. Right click the connection you have created. Select Properties

11. At the Options tab, uncheck include Windows logon domain

12. At the Security tab:-

  • Type of VPN : Layer 2 Tunnelling Protocol with IPSec (L2TP/IPSec)
  • Data encryption: Optional encryption (connect even if no encryption)
  • only check Microsoft CHAP Version 2 (MS-CHAP v2) (you may have differences setting compare to mine. Refer to you VPN administrator for the correct authentication protocol)
  • Click Advanced settings. Check Verify the Name and Usage attributes of the server's certificate


13. At the Networking tab, uncheck Internet Protocol Version 6 (TCP/IPv6)
14.Select Internet Protocol Version 4 (TCP/IPv4). Click Properties

15. Uncheck Use default gateway on remote network. (This will prevent you network traffic being route to the remote gateway)
16. Click OK

17. Click OK to close the connection Properties page
18. Double click the connection you have created. Click Connect

19.Upon connection established, verify the connection Details

20. Also verify the session in TMG 2010

Sunday, May 13, 2012

Create L2TP/IPSec Certificate for TMG 2010 using Enterprise CA

It took me quite a while to get the right certificate and to remember the steps,therefore, I am blogging it here for my future reference and also for some of us out there who may need this.


This blog is useful for you if you are about to create a certificate for your VPN using Layer 2 Tunneling Protocol with IPSec (L2TP/IPSec) that to be use with Microsoft Forefront Threat Management Gateway (TMG) 2010.


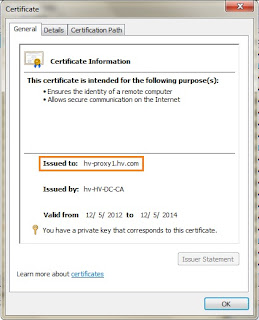
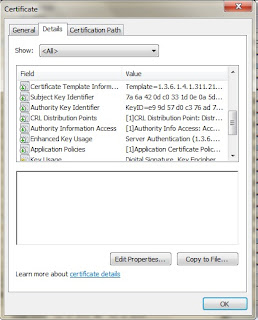
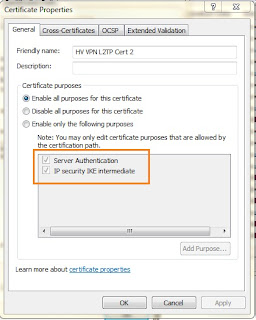
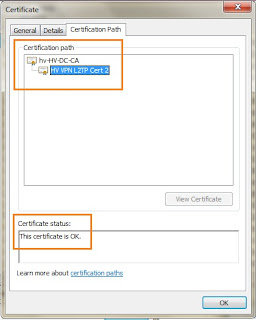
Ultimately, you have to create a certificate as shown below, with the highlighted attributes being the most critical:-
Use VPN server's FQDN as the certificate CN

Entensions that are important

Both Server 'Authentication' and 'IP Security IKE intermediate' are must included

Both Digital 'Signature' and 'Key Encipherment' must be available

Make sure the certificate path is not broken


How to create L2TP/IPsec Certificate for TMG 2010


This blog assume that a CA is deployed and is running. the first thing to do is to log on to the CA server and bring up the Server Manager (I am using Windows Server 2008 R2) and select Roles-> Certification Authority


1. On then CA Server, click Certificate Templates
2. Right click on the IPSec (Offline Request), select Duplicate Template
3. On the General page, type HV VPN L2TP IPSec 2 in the Template display name
4. You might change the Validity period to 5 years or longer.


5. Select Request Handling tab, set a checkmark in Allow private key to be exported


6. Click CSPs…, and select Requests can use any CSP available on the subject’s computer, click Ok
7. Select Extensions tab. Change the highlighted in accordance

8. Click Ok

9. Expand <Enterprise Root CA Name>
10. Right click Certificate Templates, select New, click Certificate Template to Issue

11. On the Enable Certificate Templates page select HV VPN L2TP IPSec 2 on the list and click Ok


How to request a L2TP/IPsec Certificate for TMG 2010

1. On the TMG 2010 Server (HV-PROXY1.hv.com)
2. Open Internet Explorer and browse to https://hv-dc.hv.com/Certsrv (my CA server)
3. Select Request a certificate
4. Select Advanced certificate request
5. Select Create and submit a request to this CA
6. In the Certificate Template, select HV VPN L2TP IPSec 2


7. Put a checkmark in Store certificate in the local computer certificate store
8. Click Submit
9. Click Yes to the Potential Scripting Violation box
10. Click Install this certificate
11. Click Yes to the Potential Scripting Violation box

12. Use MMC with Certificates plugin and locate the certificate at User Certificate Store->Personal


13. Right click on the certificate you just created, select All Tasks, select Export
14. On the Welcome to the Certificate Export Wizard page, click Next
15. On the Export Private Key page, select Yes, export the private key, click Next
16. On the Export file format page, leave the default and click Next
17. On the Password page, type a Password for the certificate, click Next
18. On the File to Export page, type a name for the certificate e.g. c:\Applications\Cert\HV VPN L2TP IPSec 2.pfx, click Next
19. On the Completing the Certificate Export Wizard page, click Finish
20. Click Ok


How to import the certificate to TMG 2010

The certificate now is saved on a file HV VPN L2TP IPSec 2.pfx. You have to import this certificate to the TMG 2010 Personal Store.

1. On the TMG 2010 Server, expand Certificates (Local Computer
2. Right click Personal, select All Tasks, select Import
3. On the Welcome to the Certificate Import Wizard page, click Next
4. On the File to Import page, type c:\ Applications\Cert\HV VPN L2TP IPSec 2.pfx , click Next
5. On the Password page, type the Password for the certificate, click Next
6. On the Certificate Store page, select Place all certificates in the following store, and 7. select Personal, click Next
8. On the Completing the Certificate Import Wizard page, click Finish
9. Click Ok


How to import the certificate to the VPN Client

We are now half the way of the field. So far we have create and issued a custom certificate from Enterprise CA to the TMG 2010 server. It is now we have to tackle the VPN Client which may be non domain computer. And this leave us the hard way, install the certificate manually.

1. Save the HV VPN L2TP IPSec.pbx file to the non domain computer 
2. On the non domain member computer copy the file HV VPN L2TP IPSec 2.pfx to a temporary directory.
3. Create a custom MMC for the Certificates
4. Click Start, click Run, type MMC, and then press Enter
5. Click File, and then click Add/Remove Snap in
6. Click Add, and then select Certificates from the list and click Add, select Computer
account, click Next, selectLocal computer, click Finish
7. Click Close, click Ok
8. Expand Certificates
9. Right click Personal, select All Tasks, select Import
10. On the Welcome to the Certificate Import Wizard page, click Next
11. On the File to Import page, type <dir> HV VPN L2TP IPSec 2.pfx , click Next
12. On the Password page, type the Password for the certificate, click Next
13. On the Certificate Store page, select Place all certificates in the following store, and select Personal, clickNext
14. On the Completing the Certificate Import Wizard page, click Finish
15. Click Ok


The creation and assignment of the certificate which is require for L2TP/IPSec implementation is now completed. You may now proceed with the rest configuration of the VPN server and client access.

Sunday, May 6, 2012

SCSM 2012 RTM : Self-Service Portal Installation

In this blog, I will be sharing with you of the SCSM 2012 Self-Service Portal (SSP) installation and configuration. The point i am sharing this as through my test and deployment experience, the SSP for SCSM 2012 is not easy.

Software Prerequisites:

Firstly, we have to make sure all the software prerequisites below are met:-
  • Windows Server 2008 R2 RTM or with SP1
  • IIS 7.5 with IIS 6 metabase compatibility
  • Self-signed SSL certificate (follow the FQDN of the SSP server)
  • ASP.NET 2.0
  • Microsoft .NET Framework 4.0
  • Microsoft Analysis Management Objects
  • Microsoft SharePoint Foundation 2010
  • Excel Services in SharePoint 2010 is required for hosting dashboards for advanced analytical reports

Installation:

I will skip all the screen shot of the installation of SCSM 2012 RTM as i have recorded the process in the video below:-


You can go to this link http://youtu.be/N9TRzJIwbn8 for the video above.

Post-Installation and Configurations:

Soon after the completion of the installation. You may not get the Silverlight to load the page completely and it end up partially blank as below:-

The installation does not end here. you may now have to look a little bit more in depth of each component configurations.

IIS 7

From the IIS both SCSMWebContentServer and Service Manager Portal has to bind to the same certificate.


The FQDN that has to be changed manually.

Certificate for client browser:

You have to trust the certificate that binds to the SSP.


After all the above are verified, you should be getting a page look similar as below:-

SMPortal, it works !!

And here you can see my SSP showing the case i have logged through the Portal.


Other Useful Links:

  • Nothing more useful than the top-to-bottom details about SCSM 2012 which you can find from this link.

  • Useful sharing by Petri on SCSM 2012 Beta with screen cast step-by-step


Introduction to System Center 2012 (SC 2012)


System Center 2012 is no longer a datacenter management solution tool, but it extends it functionalities toward managing the private cloud + public clouds as well. We can deliver IT as a Service for our business now, by enabling productive infrastructure, predictable applications, and cloud on your terms.

We can deliver flexible and cost-effective private-cloud infra to our business units in a self-service model, while carrying forward our existing data center investments. So just by leveraging existing TCO (Total cost of ownership), we can yield much better ROI. System Center 2012 offers deep application insight, which, combined with a “service-centric” approach, helps you deliver predictable application-service levels. Finally, the multi-hypervisors support in System Center 2012 truly makes it amazing in most of the heterogeneous environments in datacenters as well as clouds.

SC2012 Product Suites
System Center 2012 now comes with the complete suite of datacenter + cloud management solutions, they are Configuration Manager, Operation Manager, Service Manager (based on ITIL/MOF), VMM, Orchestrator, Data Protection Manager and last but not least, the App Controller. Let’s walk through all of these briefly.


App Controller

SC2012 integrates multiple datacenter management capabilities to manage not only your DC but also your clouds. App Controller is the new product in SC2012 release. It provides a role-based access for the App Owner. Besides, App Controller offers a single view of delegated resources across private and public clouds. We can deploy and manage services in addition to VMs.

The benefits that App Controller offers are as follows: -
·         Increased App Owner agility with self-service interface
·         It saves time by bringing together all delegated infrastructure
·         It improves reliability by deploying template-based services

App Controller presents a customized view based on your security credentials, so you’ll see exactly how much of the corporate resources have been dedicated to you regardless of their actual location. In other words, it’s virtualized so it’s physical placement doesn’t matter anymore.   This view spans multiple VMM servers and also incorporates Azure subscriptions, so you can really manage your services without caring anymore about the underlying resources.  You know how much capacity you have, in terms of network, storage and compute, and you can deploy services against it which allows you to save time and increase agility (response time). You can deploy services based on pre-configured templates as well.

Orchestrator
Orchestrator is simply a process automation and integration engine. It offers workflow integration and 3rd party integration. On top of that, it comes with simple design of custom workflow runbooks and integration packs (from application vendors).
The benefits of Orchestrator are abundant and one of it is that by automating repetitive tasks, it lowers cost and increases reliabilities. Besides, it also simplifies heterogeneous datacenter management.
Orchestrator leverages a simple graphical interface to construct custom workflows – with no codes required whatsoever.  It also comes with Integration Packs designed for the largest 3rd party datacenter management solutions such as BMC, HP, Tivoli and even VMware. The good news is, if the Integration Pack isn’t available, you’re able to easily design a custom one of your own.

Virtual Machine Manager
System Center 2012 has the ability to work in heterogeneous environments.  Specifically, VMM is able to manage all three major hypervisors – Hyper-V, Xen Server & ESX.  This means that you can leverage what you already own in creating a more productive infrastructure without having to decommission your existing virtualization infrastructure, which can be extremely costly. VMM in SC2012 is built with a “leverage existing TCO, and yield better ROI” thing in mind.
VMM now contains a feature called Server Application Virtualization (SAV) which allows for the separation of the application state from the underlying operating system. That simply said, instead of having a custom deployment for each application, now you can keep your core OS and SQL images in a library and then compile the service at run time.  Then when the OS needs to be updated, you simply update the library image and it will proliferate to all of the services built off that image.
Finally, VMM offers Dynamic Optimization, a feature that looks across your resources every 60 seconds and then, based on policy, will either consolidate or spread the load to meet your specifications and this is all done with Live Migration!

Configuration Manager
With this release of SC2012 we are now able to actually remediate against problems automatically which continues to increase compliance and uptime in our environment, be it in a datacenter, private or public clouds.
The Configuration Manager in SC2012 integrates the management of System Center Endpoint Protection (formerly as Forefront Endpoint Protection).  This is significantly crucial as most organizations have two entirely different infrastructures to manage the configuration/state of the client devices and the security of those devices.  By leveraging Endpoint Protection, you can virtually eliminate that second physical infrastructure.
Amongst the benefits of Configuration Manager in SC2012 are:
·         It reduces compliance complexity
·         It improves support for virtualized environments
·         It reduces cost through integrated security

Service Manager
System Center Service Manager is the process management hub which adapts the ITIL and MOF practice. New in SC2012 are the service catalog, self-service request portal, release and SLA management and the data warehousing and reporting capabilities.
Self-Service is a key principle of cloud computing, this is how the Service Consumer will request cloud capacity or a specific VM
Benefits of Service Managers are;
·         Increased organizational agility with customized service offerings
·         Improved corporate compliance through process management
·         Improved business intelligence through customized reporting i.e. Excel spreadsheet reporting support

Operation Manager
We can now have deep application insight, which is the ability to monitor applications and if performance is less than expected, we can actually see the line of code that is causing the problem and with the plug in for Visual Studio Team System, we can immediately send it over to development as a work item. This speeds up problem remediation considerably, thereby complying with SLA and doesn’t put our up time in any jeopardy whatsoever.
Also, Operation Manager now extends the monitoring functionality to the cloud by offering a management pack that allows us to monitor Windows Azure Applications as well (available for download on the System Center Marketplace).
Now we can not only monitor Windows installations, but also the UNIX and LINUX deployments. We also can monitor the network layer for the health status of all key pieces of the infrastructure. 
The last item to note is the introduction of custom dashboards that can exist in the console on the web or in a SharePoint deployment and we can have custom views designed for different people based on our log in security credentials (username & password).

The benefits of Operation Manager in SC2012 are:
·         Simplified management with visibility across the stack
·         Decreased time to resolution with deep application insight
·         Improved insights with customized/personalized reporting

Data Protection Manager
Data Protection Manager 2012 enables continuous data protection of Microsoft application, virtualization and file servers to seamlessly integrated secondary disk, tape, and cloud. It is built for enterprise scale.
Built on Operations Manager technology, DPM offers a new console that provides centralized monitoring, management, and troubleshooting of servers. From this single console, we can perform the same protection, infrastructure management, troubleshooting, and reporting tasks as we did for a single Data Protection Manager server using the administrator console.
DPM is designed to protect and recover data from applications such as: Windows file shares, client data, and system state; Hyper-V technologies; SQL servers; Sharepoint and Microsoft Exchange Server.
Another new functionality in DPM 2012 is the improved support in diverse environments. If we are running virtualized servers, DPM 2012 enables Hyper-V Item Level Recovery even when it’s running inside a VM.
DPM 2012 protects against generic data sources. It provides basic protection and recovery of any referential data sources, full backup (express, full, delta replication, and consistency check) for any application. It also supports the protection on the use of XML for applications that do not have a Volume Shadow Copy Service (VSS) writer. Last but not least, original location recovery and restoring files to a network location are feasible with DPN 2012 comes with SC 2012.

Try out our SC2012 labs on
For more info on SC2012 & the Evals download, please go to
To learn more about other MS products, please go to
www.microsoftvirtualacademy.com, it’s FREE folks! 


Source from Ken Sim