Sunday, May 6, 2012

SCSM 2012 RTM : Self-Service Portal Installation

In this blog, I will be sharing with you of the SCSM 2012 Self-Service Portal (SSP) installation and configuration. The point i am sharing this as through my test and deployment experience, the SSP for SCSM 2012 is not easy.

Software Prerequisites:

Firstly, we have to make sure all the software prerequisites below are met:-
  • Windows Server 2008 R2 RTM or with SP1
  • IIS 7.5 with IIS 6 metabase compatibility
  • Self-signed SSL certificate (follow the FQDN of the SSP server)
  • ASP.NET 2.0
  • Microsoft .NET Framework 4.0
  • Microsoft Analysis Management Objects
  • Microsoft SharePoint Foundation 2010
  • Excel Services in SharePoint 2010 is required for hosting dashboards for advanced analytical reports

Installation:

I will skip all the screen shot of the installation of SCSM 2012 RTM as i have recorded the process in the video below:-


You can go to this link http://youtu.be/N9TRzJIwbn8 for the video above.

Post-Installation and Configurations:

Soon after the completion of the installation. You may not get the Silverlight to load the page completely and it end up partially blank as below:-

The installation does not end here. you may now have to look a little bit more in depth of each component configurations.

IIS 7

From the IIS both SCSMWebContentServer and Service Manager Portal has to bind to the same certificate.


The FQDN that has to be changed manually.

Certificate for client browser:

You have to trust the certificate that binds to the SSP.


After all the above are verified, you should be getting a page look similar as below:-

SMPortal, it works !!

And here you can see my SSP showing the case i have logged through the Portal.


Other Useful Links:

  • Nothing more useful than the top-to-bottom details about SCSM 2012 which you can find from this link.

  • Useful sharing by Petri on SCSM 2012 Beta with screen cast step-by-step


Introduction to System Center 2012 (SC 2012)


System Center 2012 is no longer a datacenter management solution tool, but it extends it functionalities toward managing the private cloud + public clouds as well. We can deliver IT as a Service for our business now, by enabling productive infrastructure, predictable applications, and cloud on your terms.

We can deliver flexible and cost-effective private-cloud infra to our business units in a self-service model, while carrying forward our existing data center investments. So just by leveraging existing TCO (Total cost of ownership), we can yield much better ROI. System Center 2012 offers deep application insight, which, combined with a “service-centric” approach, helps you deliver predictable application-service levels. Finally, the multi-hypervisors support in System Center 2012 truly makes it amazing in most of the heterogeneous environments in datacenters as well as clouds.

SC2012 Product Suites
System Center 2012 now comes with the complete suite of datacenter + cloud management solutions, they are Configuration Manager, Operation Manager, Service Manager (based on ITIL/MOF), VMM, Orchestrator, Data Protection Manager and last but not least, the App Controller. Let’s walk through all of these briefly.


App Controller

SC2012 integrates multiple datacenter management capabilities to manage not only your DC but also your clouds. App Controller is the new product in SC2012 release. It provides a role-based access for the App Owner. Besides, App Controller offers a single view of delegated resources across private and public clouds. We can deploy and manage services in addition to VMs.

The benefits that App Controller offers are as follows: -
·         Increased App Owner agility with self-service interface
·         It saves time by bringing together all delegated infrastructure
·         It improves reliability by deploying template-based services

App Controller presents a customized view based on your security credentials, so you’ll see exactly how much of the corporate resources have been dedicated to you regardless of their actual location. In other words, it’s virtualized so it’s physical placement doesn’t matter anymore.   This view spans multiple VMM servers and also incorporates Azure subscriptions, so you can really manage your services without caring anymore about the underlying resources.  You know how much capacity you have, in terms of network, storage and compute, and you can deploy services against it which allows you to save time and increase agility (response time). You can deploy services based on pre-configured templates as well.

Orchestrator
Orchestrator is simply a process automation and integration engine. It offers workflow integration and 3rd party integration. On top of that, it comes with simple design of custom workflow runbooks and integration packs (from application vendors).
The benefits of Orchestrator are abundant and one of it is that by automating repetitive tasks, it lowers cost and increases reliabilities. Besides, it also simplifies heterogeneous datacenter management.
Orchestrator leverages a simple graphical interface to construct custom workflows – with no codes required whatsoever.  It also comes with Integration Packs designed for the largest 3rd party datacenter management solutions such as BMC, HP, Tivoli and even VMware. The good news is, if the Integration Pack isn’t available, you’re able to easily design a custom one of your own.

Virtual Machine Manager
System Center 2012 has the ability to work in heterogeneous environments.  Specifically, VMM is able to manage all three major hypervisors – Hyper-V, Xen Server & ESX.  This means that you can leverage what you already own in creating a more productive infrastructure without having to decommission your existing virtualization infrastructure, which can be extremely costly. VMM in SC2012 is built with a “leverage existing TCO, and yield better ROI” thing in mind.
VMM now contains a feature called Server Application Virtualization (SAV) which allows for the separation of the application state from the underlying operating system. That simply said, instead of having a custom deployment for each application, now you can keep your core OS and SQL images in a library and then compile the service at run time.  Then when the OS needs to be updated, you simply update the library image and it will proliferate to all of the services built off that image.
Finally, VMM offers Dynamic Optimization, a feature that looks across your resources every 60 seconds and then, based on policy, will either consolidate or spread the load to meet your specifications and this is all done with Live Migration!

Configuration Manager
With this release of SC2012 we are now able to actually remediate against problems automatically which continues to increase compliance and uptime in our environment, be it in a datacenter, private or public clouds.
The Configuration Manager in SC2012 integrates the management of System Center Endpoint Protection (formerly as Forefront Endpoint Protection).  This is significantly crucial as most organizations have two entirely different infrastructures to manage the configuration/state of the client devices and the security of those devices.  By leveraging Endpoint Protection, you can virtually eliminate that second physical infrastructure.
Amongst the benefits of Configuration Manager in SC2012 are:
·         It reduces compliance complexity
·         It improves support for virtualized environments
·         It reduces cost through integrated security

Service Manager
System Center Service Manager is the process management hub which adapts the ITIL and MOF practice. New in SC2012 are the service catalog, self-service request portal, release and SLA management and the data warehousing and reporting capabilities.
Self-Service is a key principle of cloud computing, this is how the Service Consumer will request cloud capacity or a specific VM
Benefits of Service Managers are;
·         Increased organizational agility with customized service offerings
·         Improved corporate compliance through process management
·         Improved business intelligence through customized reporting i.e. Excel spreadsheet reporting support

Operation Manager
We can now have deep application insight, which is the ability to monitor applications and if performance is less than expected, we can actually see the line of code that is causing the problem and with the plug in for Visual Studio Team System, we can immediately send it over to development as a work item. This speeds up problem remediation considerably, thereby complying with SLA and doesn’t put our up time in any jeopardy whatsoever.
Also, Operation Manager now extends the monitoring functionality to the cloud by offering a management pack that allows us to monitor Windows Azure Applications as well (available for download on the System Center Marketplace).
Now we can not only monitor Windows installations, but also the UNIX and LINUX deployments. We also can monitor the network layer for the health status of all key pieces of the infrastructure. 
The last item to note is the introduction of custom dashboards that can exist in the console on the web or in a SharePoint deployment and we can have custom views designed for different people based on our log in security credentials (username & password).

The benefits of Operation Manager in SC2012 are:
·         Simplified management with visibility across the stack
·         Decreased time to resolution with deep application insight
·         Improved insights with customized/personalized reporting

Data Protection Manager
Data Protection Manager 2012 enables continuous data protection of Microsoft application, virtualization and file servers to seamlessly integrated secondary disk, tape, and cloud. It is built for enterprise scale.
Built on Operations Manager technology, DPM offers a new console that provides centralized monitoring, management, and troubleshooting of servers. From this single console, we can perform the same protection, infrastructure management, troubleshooting, and reporting tasks as we did for a single Data Protection Manager server using the administrator console.
DPM is designed to protect and recover data from applications such as: Windows file shares, client data, and system state; Hyper-V technologies; SQL servers; Sharepoint and Microsoft Exchange Server.
Another new functionality in DPM 2012 is the improved support in diverse environments. If we are running virtualized servers, DPM 2012 enables Hyper-V Item Level Recovery even when it’s running inside a VM.
DPM 2012 protects against generic data sources. It provides basic protection and recovery of any referential data sources, full backup (express, full, delta replication, and consistency check) for any application. It also supports the protection on the use of XML for applications that do not have a Volume Shadow Copy Service (VSS) writer. Last but not least, original location recovery and restoring files to a network location are feasible with DPN 2012 comes with SC 2012.

Try out our SC2012 labs on
For more info on SC2012 & the Evals download, please go to
To learn more about other MS products, please go to
www.microsoftvirtualacademy.com, it’s FREE folks! 


Source from Ken Sim

Monday, April 30, 2012

Enable Schedule for SCSM 2012 ETL

By default, the schedules for the extract, transform, and load (ETL) jobs are not enabled. If ETL is now enabled, you will get no data from SCSM console when generating any report.

In this release of Service Manager (System Center 2012 – Service Manager), you can enable the schedules only by using Windows PowerShell.


Enable-SCDWJobSchedule –JobName Extract_<data warehouse management group name>
Enable-SCDWJobSchedule –JobName Extract_<Service Manager management group name>
Enable-SCDWJobSchedule –JobName Transform.Common
Enable-SCDWJobSchedule –JobName Load.Common


Sunday, April 22, 2012

Hyper-V Live Migration of Windows Server 8 Beta


Hyper-V Live Migration of Yesterday
When Hyper-V 2.0 introduced together with Windows Server 2008 R2, it was indeed has brought Microsoft into the leader quadrant as one of the Virtualization player in the market. One of the feature which brought Hyper-V close (if not at par) with other rivals is the introduce of Cluster Shared Volume (CSV) which has brought Live Migration (a.k.a VMotion in VMWare) a reality. With Hyper-V 2.0 and CSV, Microsoft introduce the High Availability (HA) to their Virtualization solutions.

Live migration allows you to transparently move running virtual machines from one Hyper-V node of the failover cluster to another Hyper-V node in the same cluster without a dropped network connection or perceived downtime. All virtual machines are stored in the shared storage area which can be an iSCSI or Fiber-Channel Storage Area Network (SAN) , and the running virtual machine state is managed by one of the nodes. A technical write up in detail of Using Live Migration with Cluster Shared Volumes in Windows Server 2008 R2 is made available for some of us who want to dig further how stuffs works.


Hyper-V Live Migration of Today
Windows Server 8 Beta is available now and among all interesting new features, Hyper-V 3.0 is in bundled a lot more new features. In this blog, we will look at Live Migration in compare to Hyper-V 2.0 which introduced with Windows Server 2008 R2.

In Hyper-V 3.0, Live Migration are now refer to Hyper-V Virtual Machine Mobility which consists of:

  • Live Migration Without Shared Storage
  • Live Migration with SMB Shared Storage
  • Live Migration with Failover Cluster
  • Storage Migration (YES, you can now live migrate VM's storage)
The Key benefits of Live Migration in Windows Server 8 Beta is delivers improved performance and flexibility. It is also now available inside and outside of clustered environments—both with and without shared storage.

Live Migration Without Shared Storage
Also know as 'Shared Nothing Live Migration' is the most jaw dropping feature in Hyper-V 3.0. As its name suggest, you do not require any shared storage for Live Migration to kick off. AWESOME !!
Be aware that this option of Live Migration does not provide any High Availability (HA) capability. In my very own opinion, you may consider this option in a small scale deployment/environment.


Live Migration with SMB Shared Storage (SMB)
Hyper-V 3.0 Live Migration could now leverage on SMB 2.2 in WIndows Server 8 Beta. With SMB 2.2, file sharing performance is greatly enhanced and the most significant enhancement direct affect the capabilities of Hyper-V 3.0 is the support of multichannel.

And as i am writing this blog, SMB 3.0 is there for Windows Server 2012. Read more at Windows Server Blog. Our friends, Beh Chor How, has an experience on this and he had this blog at V-Enfra.

If you are not ready to deploy a clustered Hyper-V environment and wanting to enjoy the live migration almost similar with Hyper-V Cluster, then this will be one of the options for you. Sweet and simple ! :-)


Live Migration with Failover Clusters
The similar feature (if not the same) Hyper-V cluster with Failover Cluster introduced in Windows Server 2008 R2. To mention a few significant improvement, these are:-

  • Simultaneous Live Migration
  • VM Liive Migration Queue
  • Clustered Share Volume (CSV 2.0)  

This will be the most ideal deployment for enterprise level organisation for highly virtualized infrastructure and HA capabilities.


Live Storage Migration
Oh yes, 'LIVE STORAGE MIGRATION', is a new thing in Hyper-V 3.0 Clustered. You may get more details at Windows Server 8- Truly Live Storage Migration.


Sunday, April 15, 2012

System Center 2012 CTP for Windows Server "8" Beta

Have done some preliminary readings about CTP and its material.

What is CTP
Community Technology Preview (“CTP”) enables System Center customers to jointly evaluate System Center 2012 and Windows Server “8” Beta. Customers should use this CTP for their evaluations of Windows Server “8” beta, and to provide Microsoft with feedback on both products. The CTP includes updates to the Virtual Machine Manager and Data Protection Manager components of System Center 2012.


What are the technology available now in CTP
As of now, there are only 2 products available in CTP program, these are:-
  • Virtual Machine Manager 2012
  • Data Protection Manager 2012

What do I get out of SC2012 CTP

Virtual Machine Manager
The CTP enables the Virtual Machine Manager component's management server to run on Windows Server “8” as well as managing virtual machines (VMs) hosted on Windows Server “8”. The CTP also enables management of new Windows Server “8” features in Virtual Machine Manager:

  • Creation of Hyper-V Virtual Networks using Hyper-V Network Virtualization
  • Creation of virtual machines using the VHDx format
  • SMB 2.2 file servers as storage for virtual machines in a clustered and non-clustered environment
  • Live migration and live storage migration
Data Protection Manager The CTP enables the Data Protection Manager component's repository and agents to run on Windows Server ‘8” as well as providing protection in Windows Server “8” environments. The CTP also adds protection for new features in Windows Server “8”:

  • Hyper-V Virtual Machines on Cluster Shared Volumes 2.0 (CSV2.0)
  • Hyper-V Virtual Machines on remote SMB share
  • Files on De-Duplicated Volumes

What are the system requirements


Supported operating systems: Windows Server 2008, Windows Server 2008 R2, Windows Server 8 Beta

Data Protection Manager:
Windows 2008
Windows 2008 R2
Windows "8" Beta

Virtual Machine Manager:
 
Windows “8” Beta (Management Server, Console, Library Server, VM Hosts)
Windows “8” Beta or Windows Server 2008 R2 (Database Server)
Windows Server “8” is the only supported guest operating system

Other Software: SQL Server 2008 R2 with SP1, Standard, Enterprise or Datacenter Edition, 64-bit edition only

Pre-requisite Software: .NET 3.5

Hypervisor:  Data Protection Manager: Not applicable
Virtual Machine Manager: Hyper-V on Windows Server "8" only

Where can I get CTP
http://www.microsoft.com/download/en/details.aspx?id=29099


Saturday, April 7, 2012

Hyper-V Replica of Windows Server 8 Beta

I have blogged about Hyper-V replica a while ago when Windows Server 8 release as Developer Preview. And here comes the Windows Server 8 Beta released not long ago, Hyper-V Replica is everywhere on the net most exciting part of it, more and more detailed technical documentation make available by Microsoft to the public particular to this piece of Hyper-V components.
My first look is on the Windows Server 8 Hyper-V Component Architecture Poster and my first expression was…………<speechless>………..and WOW !!!! IMPRESSIVE!

Windows Server "8" Beta Hyper-V Component Architecture Poster

"Hyper-V Replica is an asynchronous virtual machine replication technology that is included in Windows Server "8" Beta. It is designed for business continuity and disaster recovery. It works with any server, network, or storage vendor. It does not require any shared storage. It enables you to replicate individual or multiple virtual machines. Hyper-V Replica is tightly integrated with Hyper-V and Failover Clustering. You can replicate virtual machines from one computer running Hyper-V at a primary site (the primary server) to another computer running Hyper-V at a Replica site (the Replica server). The Replica server accepts incoming replication traffic from one or more primary servers." - Windows Server "8" Beta Hyper-V Component Architecture Poster

Figure 1: Windows Server "8" Beta Hyper-V Component Architecture Poster

Technical Write Up
A document on Understand and Troubleshoot Hyper-V Replica in Windows Server "8" Beta is available for you if you are looking for the detailed bits of Hyper-V Replica in Windows Server 8. I personally find that this document is very useful for someone like me who involves in proposing Hyper-V design.

Hyper-V Replica with Powershell
For some of you would like to deploy Hyper-V with Server Core installation, you may be looking into managing Hyper-V Replica using Powershell. The below 2 blogs you may be interested in :

Technical Diagram of Hyper-V Replica


My previous testing and blog of Hyper-V Replica
You may refer to :-
How-To: Enable Hyper-V 3.0 Replica (Part 1)

More testing on the way when I secured hardware for testing :-)

Sunday, January 29, 2012

How-To: Enable Hyper-V 3.0 Replica (Part 2)

As promise in my previous blog How-To: Enable Hyper-V 3.0 Replica (Part 1), I have capture a full video of my testing on Hyper-V 3.0 Replica. Below are the videos and it is best view at 720p resolution:-

Hyper-V 3.0 Replica Highlights During Testing
As usual, i did quite number of things that may be does not make sense with the purpose to see how is the Hyper-V manager handle this. Below are some of the things that I have tried to perform during the testing.

Maximum number of recovery point
Notice that the Store additional recovery points have a maximum value of 15.

Figure 1: Maximum value of Store additional recovery point is 15

Schedule Initial Replication
You can only schedule the Initial Replication not later than 7 days.
Figure 2: Schedule of Initial Replication must be within 7 days


Power up the VM during replication
When you try to power up the VM during the Replication in progress, This is the error you will get.
Figure 3: Error when power up VM during replication
Network Utilization During Initial Replication
The network utilization at 95% of 100Mbps during Initial Replication. Looking forward to test again when i got 1Gbps switch.
Figure 4: Network utilization
Report of Replication Health
Report is available to tell you the statistics and status of VM replication.
Figure 5: Replication Health Report
Failover test
You can use failover test to test the functionality of the replicated VM. The Test Failover feature will create a test VM of the replicated VM with just a click away.
Figure 6: Test Failover

Plan Failover must turn off production VM
Your planed failover will not work if the production VM is still running.
Figure 7: Planned Failover failed
Figure 8: Planned Failover started
Reverse Failover
Reverse Failover is necessary when the production Hyper-V host is running and you want your VM return to that host.
Figure 9: Reverse Replication for VM that was failover to DR Hyper-V host


Thursday, January 26, 2012

How-To: Enable Hyper-V 3.0 Replica (Part 1)

Challenges of Replication in those days
In previous day, replication is complex to configure and setup and often requires expensive proprietaty hardware or software. Due to this,not many of us could afford replication of VMs for disaster recovery copy. Well what about to change the way we design our DR center in the next few months is that Microsoft's Hyper-V 3.0 is to bundle with Hyper-V Replica.

Hyper-V Replica
Hyper-V Replica is asynchronous, application consistent, virtual machine replication built-in to Windows Server 8. With Hyper-V Replica, you can replicate a virtual machine from one location to another with Hyper-V and a network connection. Hyper-V Replica works with any server vendor, any network vendor and any storage vendor. In addition, we will provide unlimited replication in the box. With Hyper-V Replica, we could now design our disaster recovery site in a more cost effective way.

Setup
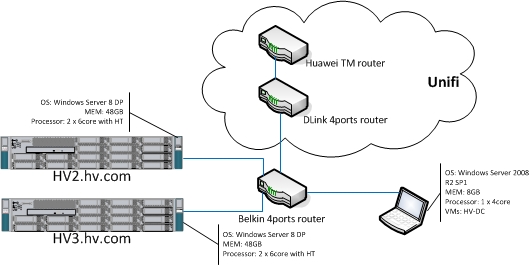
Figure 1: My test environment

This setup require:-
2. Windows Server 2008 R2 SP1

*Note: The Hyper-V Replica of Hyper-V 3.0 which bundle in Microsoft Server 8 Developer Preview and its feature are subject to changes when Windows Server 8 RTM released.

Enabling Hyper-V Replica
If you have not have your test server install with Windows Server 8 DP, you may follow my blog How To: Windows Server 8 Boot from VHD to install Windows Server 8 DP on VHD and How-To: Install Hyper-V Role on Windows Server 8 to install Hyper-V role on Windows Server 8 DP.


1. Click Start and launch Hyper-V Manager
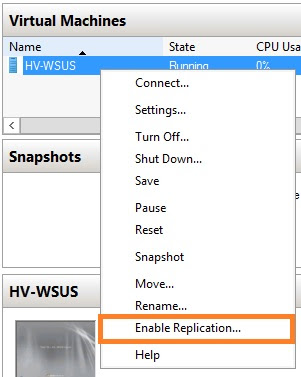
2. Select the VM that you want to enable replication, right-lick and select Enable Replication.
Figure 2: Select Enable Replication...
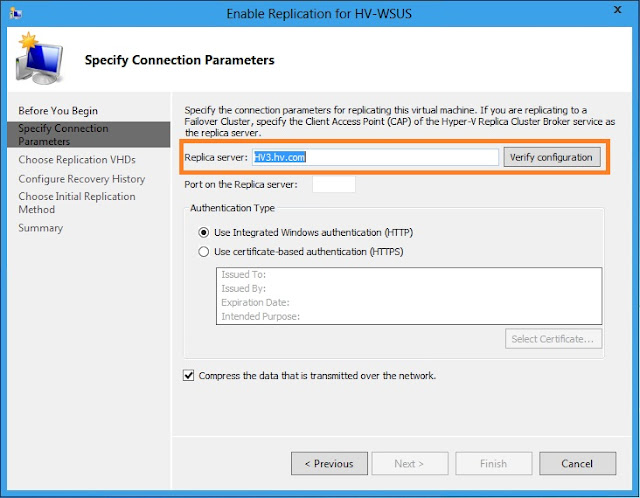
3. Specify Replica Server with FQDN of the target Hyper-V server where you want to move the VM. Click Verify Configuration
Figure 2: Enable Replication of Hyper-V server
4. If this is the first time replication is enable for the server, click Configure server.
Figure 3: Enable replication for first time
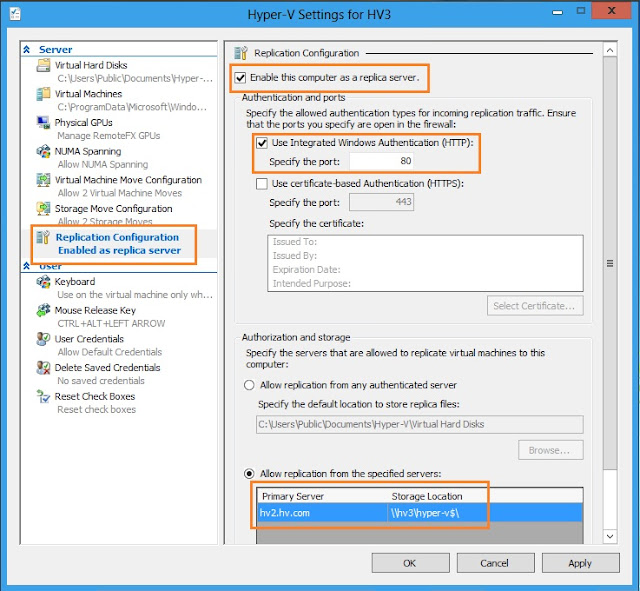
5. Select Replication Configuration on the left pane of Hyper-V Settings page. Check Enable this computer as replica server, check Use Integrated Windows Authentication (HTTP) and make sure it use port 80, check Allow replication from specified servers and select the source Hyper-V server and storage location.

Figure 4: Replication Configuration on target Hyper-V Server
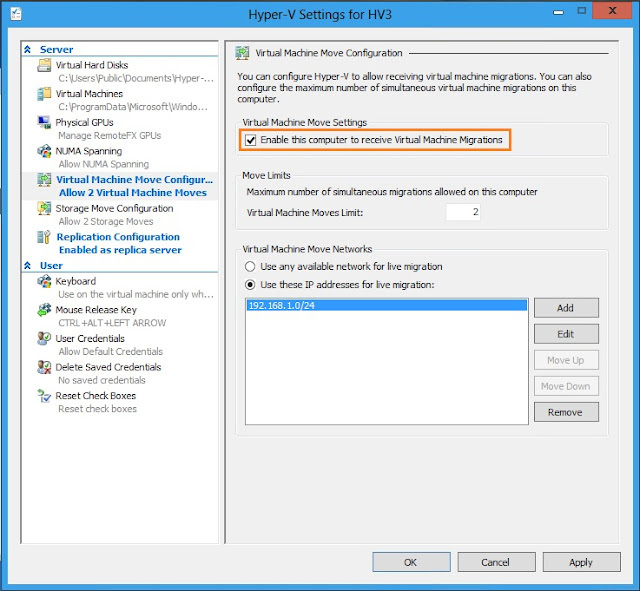
6. Select Virtual Machine Move Configuration on left pane. Check Enable this computer to receive Virtual Machine Migrations. Click Apply.
Figure 5: Virtual Machine Move Configuration
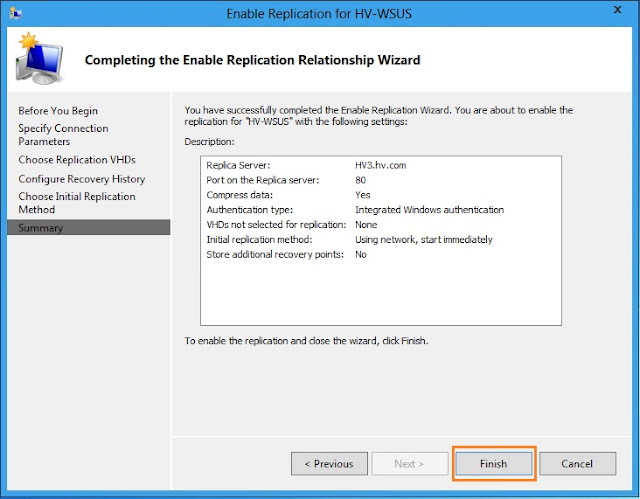
7. Click Next until Summary. Click Finish. Upon Finish is clicked, the initial replication will kick start.
Figure 6: Finish enabling Hyper-V Replica
I am currently working on capturing data and video when the initial replication take place and I will post them as How-To: Enable Hyper-V 3.0 Replica (Part 2).

Update 29 January 2012 :-
How-To: Enable Hyper-V 3.0 Replica (Part 2) is available.


Wednesday, January 25, 2012

How-To: NIC Teaming with Windows Server 8 Developer Preview

NIC teaming are now bundle with Microsoft Windows Server 8. With this exciting bundle, IT engineer will no longer suffer in configuring teaming software which proprietary to hardware vendors most occasions. AND this also means the NIC teaming of Windows Server 8 is applicable to NIC of diferrent manufacturers.

Jut got a little time to test out how does this work. Thanks to Noel i got my chance to get my hands on the a pair of CISCO UCS C series, and these server are as shown below
Figure 1: CISCO UCS C-Series Rackmount
My setup was having 2 x NIC of the server connects to my home router, a very common Belkin ADSL router. And here goes the configuration steps :-

1. Click Start and select Server Manager.
2. Click Disable at the NIC Teaming.
Figure 2: NIC Teaming at Server Manager pane
3. Click OK at Manager Servers window.
Figure 3: Managed Servers
 4. Select HV2 (or the server you are about to configure) and notice that there are 2 x NIC present.
Figure 4: NIC Teaming window
 5. The diagram below shows my NICs speed. 100Mbps... =(
Figure 5: NIC Speed
 6. Click Tasks and select New Team.
Figure 6: Teams pane
 7. Type in prefer Team Name and Team Interface Name. Select the NICs you want to team.
Figure 7: Add Team
 8. Select Advanced on the left pane and select Switch Independent for Teaming Mode and Address Hash for Load Distribution Mode. Click Apply.
Figure 8: Add Team (advanced)
 9. New teamed NIC created.
Figure 9: NIC Teaming
 10. Check the created NIC.


Sunday, January 22, 2012

How-To: Install Hyper-V Role on Windows Server 8

If you have not install Windows Server 8 Developer Preview yet, you may also follow guide which i have blogged earlier at How To: Windows Server 8 Boot from VHD. Upon the installation of Windows Server 8, you may proceed with the steps below for Hyper-V V3 role installation:-

1. In Windows Server 8 Developer Preview, launch the Server Manager Console.
2. If you have not launch the Server Manager, click on Start > Server Manager.
3. At the Dashboard, click add roles
Figure1: Dashboard of Server Manager
4. At the Add Roles and Features Wizard page, select Role-based or Feature-based Installation.
Figure2: Add Roles and Features Wizard
5. Click Next until Server Roles.
6. At the Select Server Roles page, select Hyper-V.
7. Click Next until Confirmation.
8. At the Confirm installation selections page, check Restart each destination server automatically if required.
Figure3: Confirmation
Figure4: Role installation in progress
9. After the server has completed rebooting, log back on to the Windows Server 8 Developer Preview with following credentials:
10. Close the Server Manager window.
11. Launch the Server Manager, click on Start > Server Manager.
12. Click on Hyper-V Manager.
Figure5: Hyper-V Manager from Start
Figure6: Hyper-V Manager

Saturday, January 7, 2012

How To: Windows Server 8 Boot from VHD

Lately have been trying out Windows Server 8 on Hyper-V and decided to boot up Windows Server 8 directly from my notebook. What I discovered is that it seem like the sysprep-ed of the OS on VHD are not bootable by using the similar way what we have for Windows 7 and Windows Server 2008 R2.

My current running OS is Windows Server 2008 R2 SP1 on physical partition and a boot from VHD with Windows 7.

Found out blogs on the net which use this concept:
1. Boot machine with Windows Server 8 Developer Preview DVD
2. Bring out the 'Command Prompt'
3. Use 'Diskpart' to create and attach an empty VHD
4. Continue the installation of Windows Server 8

Below are the set of steps and commands you need:-
1. Insert 'Windows Developer Preview' to your DVD-Rom. If you have not had a copy go here to download a copy.
2. Boot your computer with the 'Windows Developer Preview' DVD.
3. At the first Setup page, press 'Shift + F10' to bring out 'Command Prompt'

4. Type 'diskpart'
5. Type 'list disk'. This guide assume your computer has 1 hard drive, so the expected result is you get 'Disk 0' listed.
6. Type 'select disk 0'
7. Type 'list volume'. you should see all your existing partition on the hard drive with 'Drive Letter'.
8. Type 'create vdisk file=<drive:>\windows8.vhd maximum 80000 type expandable'. Replace <drive:> with the drive letter where you want to store the VHD. This will  create a VHD with size 80GB.
9. Type 'select vdisk file=<drive:>\windows8.vhd'.
10. Type 'attach vdisk'
11. Type 'exit'
12. Continue with the installation step.
13. You will see 'Disk1' during the disk and partition selection.

UPDATE:
22 January 2012
To install Hyper-V V3 role on Windows Server 8, you may use my guide at How-To: Install Hyper-V Role on Windows Server 8