Sunday, November 15, 2009

How To: Free iSCSI storage with Fedora 10

This how-to guide explains how did I set up an iSCSI target using Fedora 10 and iSCSI initiator on Windows Vista. I was always wondering to setup a free iSCSI storage at home to enable me further run testing with SCVMM (System Center Virtual Machine Manager) R2 with CSV (Cluster Share Volume) as it is hard to get a copy of Windows iSCSI Target Software, unless you have a very good relations with OEM partners.
As hardware remain my main obstacle, I actually setup the iSCSI Target server on Virtual PC


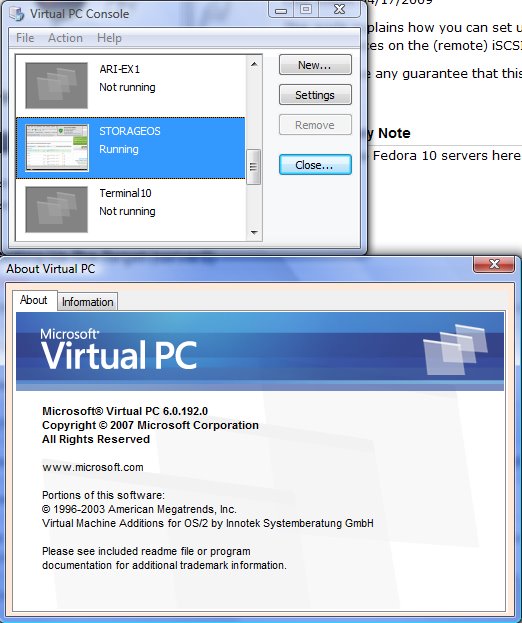
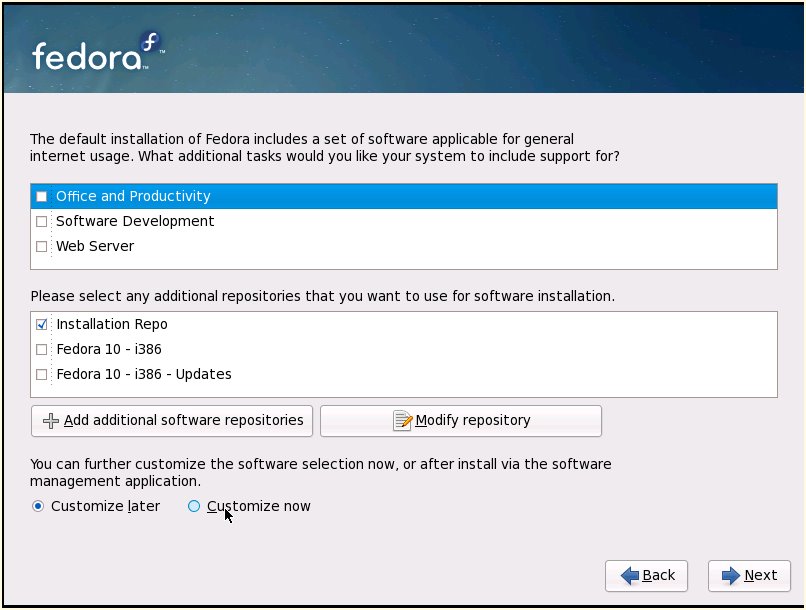
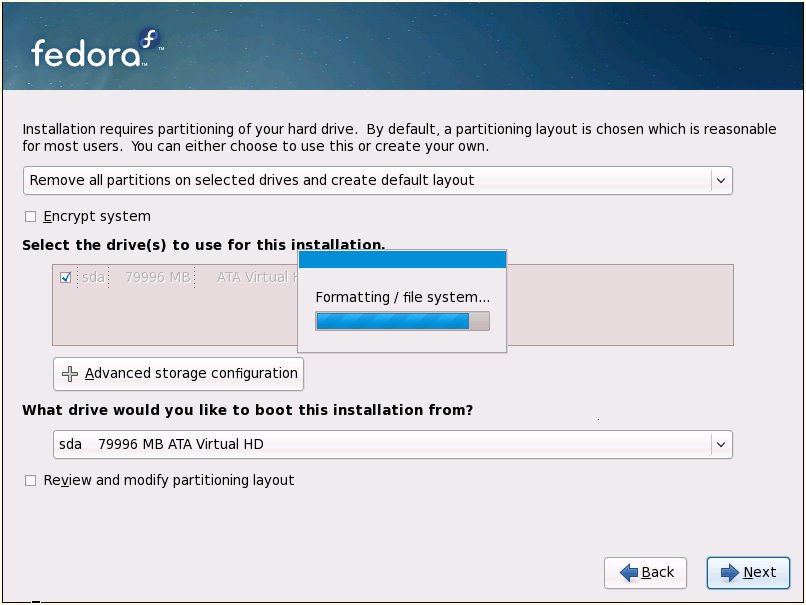
To find out how Fedora 10 can be setup on Virtual PC, see my blog on How-To: Fedora 10 Installtion on Virtual PC here.

Setting up the iSCSI Target (Fedora 10)


  1. Get a copy of iSCSI Enterprise Target (IET) at RPM Fusion
rpm -Uvh http://download1.rpmfusion.org/free/fedora/rpmfusion-free-release-stable.noarch.rpm http://download1.rpmfusion.org/nonfree/fedora/rpmfusion-nonfree-release-stable.noarch.rpm


  1. Install the iSCSI target packages:
yum install iscsitarget kmod-iscsitarget

  1. Restart the server.

  1. Get a copy of RPM package of Webmin at www.webmin.com and install in on the server.
    wget http://prdownloads.sourceforge.net/webadmin/webmin-1.490-1.noarch.rpm
    rpm -U webmin-1.490-1.noarch.rpm


    1. Get a copy of iSCSI Target module from http://www.webmin.com/cgi-bin/search_third.cgi?recent=1.
      wget http://update.intellique.com/pub/iscsitarget-0.9.3.wbm

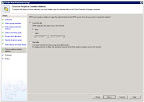
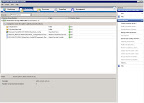
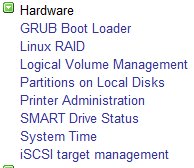
    1. Access to Webmin using you favorite internet browser. Select Hardware and then iSCSI target management.


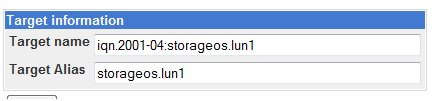
    1. Click on Create a new target


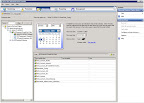
    1. Type in your prefer target name and alias


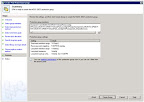
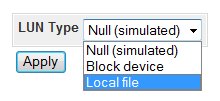
    1. Click on Add a Logical Unit


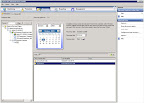
    1. In my case, I have select to use Local file. If you want to use block device, refer to the Use Block IO bottom of this post.


    1. When completed the LUN is ready


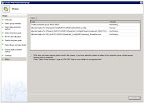
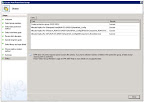
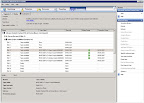
    1. You are now require to restart the iscsi-target service

    Setting up the iSCSI Initiator (Windows Vista)

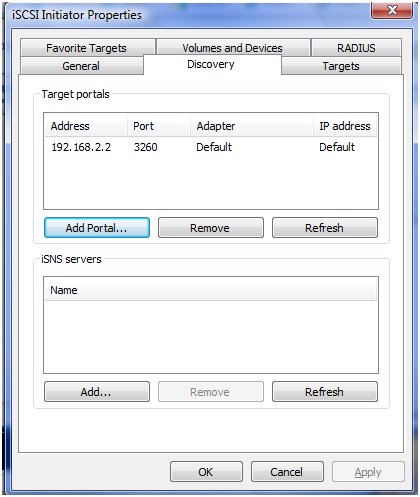
    1. Go to Discovery tab. Add a Target portals.


    1. Go to Targets tab.


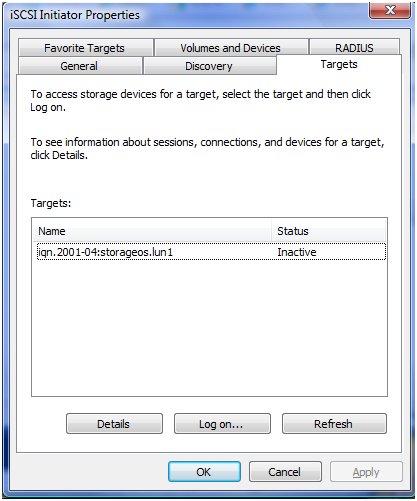
    1. Select the target and click Log on. Click OK.


    1. The status now will turn to connected.


    1. Right-click My Computer and select Manage.
    2. Go to Disk Management and then Storage. The new disk now is visible.


    Use Block IO
    It required you to allocate a new hard drive, or storage media for you to use BlockIO in IET. In my case, i am attaching a new hard drive and detect as /dev/sdb.


    1. Check the drive detail
      fdisk -l /dev/sdb

    2. Create new partition
      fdisk /dev/sdb
      Command (m for help): n
      accept default value to allocate all capacity

    3. Create filesystem. In my case, i am attaching the LUN to my Windows server, therefore i used NTFS
      mkntfs -f -L LUN1 -v /dev/sdb1

    4. Edit the ietd.conf
      Target iqn.2009-11:com.cotonso.storage2.lun1
              Alias com.cotonso.storage2.lun1
              Lun 0 Type=blockio,Path=/dev/sdb1,IOMode=wthru

    5. Restart IET service

    References

    Thursday, November 12, 2009

    How To: Fedora 10 Installation on Virtual PC

    1. Get Fedora 10 Distribution from http://fedoraproject.org/get-fedora.html .
    2. Create a virtual machine as ussual. Capture the Fedora 10 ISO image or use your CD\DVD drive if you have burn a copy to a disc.
    3. Boot up the virtual machine an you will find yourself at the boot screen.
    4. Hit e to edit the boot parameters.


    5. Add noreplace-paravirt singles as shown.


    6. Hit b to continue the boot process.


    7. Choose the packages according to your prefer preferences


    8. Installation in progress


    9. Click Finish to reboot the machine and complete the installation.

    10. For the first boot up, quickly hit F10 just after the BIOS screen to display the GRUB boot opyions.
    11. Type in the boot parameters as shown in step 5 and continue the boot process.
    12. Login to the system and ammend the /boot/grub/grub.conf file as shown below.


    13. Save and exit the editor. Run terminal# grub.
           Grub#> grub-install --no-floppy /dev/sda

    14. You will be able to load up to the login screen the next time you boot up.

    Wednesday, October 28, 2009

    DPM 2010 Beta is available now

    The Data Protection Manager (DPM) team at Microsoft is announcing the arrival of Data Protection Manager 2010 Beta.

    Anand Kamat the Group Product Manager for the DPM development team, and since shipping DPM 2007 SP1 in Jan 2009, quoted that it have been on an amazing journey to get this feature packed release out to all Microsoft customers.

    This new definitely did cought my attention as i have have Hyper-V and SCVMM deployed on Windows Server 2008 R2 using Cluster Shared Volumes (CSV) cluster. DPM 2010 new features now support and protect CSV cluster.

    "This has been one of the biggest investments that we made in DPM 2010, and we hope that you will absolutely love the features.  First and foremost, DPM 2010 Beta protects highly available virtual machines (VM) deployed on Windows Server 2008 R2 using Cluster Shared Volumes (CSV) clusters -- in addition to standalone Hyper-V servers and Windows Server 2008 Hyper-V clusters. For all above mentioned server configurations, DPM 2010 Beta supports:
    Seamless protection of Live Migrating VMs (For Windows Server 2008 R2): DPM 2010 is LiveMigration aware and seamlessly protects a VM after it migrates to another node of the Hyper-V R2 cluster to another without manual intervention.
    Item Level Recovery from host level backup: DPM 2010 Beta supports item level recovery (ILR) which allows you to do granular recovery of files and folders, volumes and virtual hard disks (VHD) from a host level backup of Hyper-V VMs to a network share or a volume on a DPM protected server.
    Original Location Recovery: DPM 2010 Beta supports online recovery of the protected VM to the original location.
    Alternate Host Recovery: DPM 2010 Beta supports alternate location recovery (ALR) which allows you to recover a Hyper-V VM to an alternate stand-alone or clustered Hyper-V host."

     For those out there who have CSV cluster deployed, or looking forward to deploy SCVMM, DPM 2010 may be one of your preferable solution.


    Peoples also claim that DPM2010 are now able to protect non-domain and workgroup clients.

    -Repost- SharePoint Protection and Recovery using DPM 2007

    If you are about to use DPM 2007 to protect you MOSS 2007, then you must not miss out the articles below. This is a repost version by me as i found that you may not be able to protect your MOSS 2007's forms and databases without pre-configure both your DPM 2007 and MOSS 2007 servers.

    SharePoint Protection and Recovery using DPM 2007 - Part I
    With SharePoint gaining popularity in the last year and the recent release of DPM 2007 which supports the protection of SharePoint this has become a hot topic in the last few months. The protection and recovery of SharePoint data is not small undertaking and there is quite a bit of flexibility with what you can recover. For this reason, let me caution you in that this can be a complex undertaking but once the methods are understood, its benefits far surpass the trouble of the initial learning curve.
    So let’s start with the basics of what is required in order to protect SharePoint with DPM and we will expand from there. Over the course of this series, we will cover protection and recovery on several various levels, each of which will have it’s own nuances which dictate this breadth of coverage.
        • Protection Requirements
        • Recovery of a SharePoint Farm
        • Recovery of a SharePoint DB
        • Recovery of a SharePoint Object (Site, sub-Site, folder, file, etc.)
    We begin with the Protection Requirements. Below is a list of what is needed to fully protect and recover SharePoint data.

        • DPM 2007 only protects “Microsoft Windows SharePoint Services 3.0” and “Microsoft Office SharePoint Server (MOSS) 2007”. If this is not what is installed in your environment, now is a good time to look at upgrading.
        • The SharePoint patch from 941422 must be installed on all servers. Install Knowledge Base article 941422, "Update for Windows SharePoint Services 3.0" (http://go.microsoft.com/fwlink/?LinkId=100392 )
        • There must be a second SharePoint Farm installed. This can be a VM somewhere as it only needs to be a single server install. It does however, require that you have enough space presented to the VM in order to restore any site and its database. Consider the size of your largest Content database and its URL structure and add about 20%. This is your starting point for the storage on your recovery server.
        • The recovery server will have to have a web application called DPMRecoveryWebApplication created on it. If this name is not found, recovery of some SharePoint data will not be possible.
        • The WSS writer must be registered and configured for DPM to use.
        • DPM must have use of an account which is a Farm Administrator otherwise, it will not have sufficient permissions.
        • The DPM Agent specifically requires the VSS patch 940349 and .NET Framework 2.0 to be installed in addition to the SharePoint requirements. 

     
    Let’s start with the following assumptions:
        1. SharePointA – Production SharePoint server
            Port 8080 – Administration port
            ○ Port 8081 – Production Website port
            ○ Port 8083 – Alternate Recovery Site on production Farm.

        2. SharePointB – Recovery SharePoint server
        3. DPMRecoveryWebApplication – web application only created on SharePointB.
        4. DPM Agent installed on both SharePoint servers.
        5. SharePoint patch 941422 has been installed on both SharePoint servers.
    With this configuration, we can restore any site to its original or alternate location or we can also recover a Content Database or the entire Farm.
    To start and register the WSS Writer service:

        1. Open a command prompt window using elevated privileges. From within the Command Windows, navigate to C:\Program Files\Microsoft Data Protection Manager\DPM\bin and launch 'ConfigureSharepoint.exe'
        2. In the command window that appears, you will see the request "Enter the user name for “WSSCmdletsWrapper:" Enter the account name for the user account you granted Farm Administrator credentials
            ○ If you enter an invalid account, you will receive the following:
            ○ Invalid user name.
            ○ Examples of valid user name are "username@domain" and "domain\username".
            ○ Once you add a Fully Qualified account name and hit enter, you are presented with the next line requesting a password.
        3. Enter the password for 'WSSCmdletsWrapper':

     
    After a moment of configuring, the entry "The command completed successfully" will appear and the CMD window will close.
    DPM only offers the option of protecting the entire SharePoint farm as seen in the screenshot below. This changes when the discussion revolves around recovery of data, as we will see in the next section. DPM provide a great deal of granularity when it comes to recovery of SharePoint data.

    If the WSSCmdletsWrapper is not registered properly, then the SharePoint farm you see in the screen shot above will not appear. If it is missing, run the ConfigureSharePoint.exe utility on a SharePoint front-end web server to allow DPM to reconfigure the necessary options.


    At this stage, you should be able to create a DPM Protection Group which contains the SharePoint servers take an initial replication of the content. Depending on the size of the sites, this can take a few minutes to hours to complete.
    Since there are numerous distributed SharePoint implementations across many servers, we need to talk about which of these servers to protect. Here is a short list.


    Web Front-end servers – Since all are the same, only one will need to have the ConfigureSharePoint.exe on it to register the WSS Writer.


    Configuration Database Server – The data stored here is unique and not stored on other database servers so it is vital that you have a DPM Agent installed to protect it.


    Content Database Servers - Content databases host all the information, content, and data of the farm. Each needs to be protected by a DPM Agent.


    Creating the DPMRecoveryWebApplication in SharePoint
    Before DPM can be used to recover any data to a protected Farm, the DPMRecoveryWebApplication must be created on the recovery farm’s server. As a requirement of the restoration process, it is helpful to understand the process necessary to create this SharePoint Web Application.
    Below are the steps necessary to create the DPMRecoveryWebApplication.

        1. Open the SharePoint 3.0 Central Administration console from the Start Menu.
        2. Once the SharePoint 3.0 Central Administration console is open, click on the Application Management tab which opens to display all of the various options for managing your SharePoint installation.
        3. Look under the SharePoint Web Application Management heading to find the Web application list at the bottom and select this menu item.
        4. When the Web Application List appears, check through the list to confirm that the DPMRecoveryWebApplication does not already exist. If it does exist, you are free to delete it and continue with these instructions or you may continue with the one that exists. If it does not exist, please continue through the following steps to create one.
        5. Click the “back arrow” to return to the Application Management page. Under the SharePoint Web Application Management heading, click on the Create or Extend Web application.
        6. The Create or Extend Web application page appears with two options. The first called Create a new Web application is the one we will choose. The second option, Extend an existing Web application is not needed for this purpose.
        7. After clicking the Create a new Web application link, the Create New Web Application page appears displaying various necessary fields for details about the web application that is being created. Here is a brief summary of the important fields of this page.

            ○ Chose the Create a new IIS web site and in the description, name it “DPMRecoveryWebApplication”.
            ○ In the Port field, give it a unique port which is not shared by any other internal application. In the example below, note that the port is 911 since this is our emergency recovery web application for SharePoint failures.
            ○ The Host Header and Path fields can remain unchanged.
            ○ Scroll down to the radio button Create new application pool and in the Application pool name box, note that the entry name includes the port number and the SharePoint recovery server name.
            ○ Under the Select a security account for this application pool, select the Configurable radio button and type in a suitable account and password in the fields that follow. Note the security warning at the top of the page indicating that the credentials of this account may be transmitted in clear-text across the network.
            ○ Lastly, in the Database Name box, type in DPMRecoveryWebApplication.


    This is the last entry to make before hitting OK to have the web application created. This will take a few moments but once complete, DPM will be able to recover SharePoint data. Upon completion of the DPMRecoveryWebApplication web application, the Application Created screen appears. At this point, schedule time to run ‘iisreset /noforce’ and once complete, DPM will be able to recover SharePoint data using this recovery farm.


    Once these steps have been completed such as the installation of the DPM Agent on the various SharePoint servers, registering the WSS writer, creation of the DPMRecoveryWebApplication on the recovery server, and creation of a recovery site in the production farm, you are ready to protect your SharePoint data.


    Next, we will take a look at the steps necessary to recover the entire SharePoint farm whether the production farm is available or not.


    Posted: Tuesday, June 24, 2008 2:13 PM by jeffhugh
    Filed under: DPM


    Original Post <http://blogs.technet.com/askcore/archive/2008/06/24/sharepoint-protection-and-recovery-using-dpm-2007-part-i.aspx>

    How To: Protect MOSS 2007 using DPM 2007

    How To: Protect MOSS 2007 using DPM 2007


    Tuesday, October 27, 2009

    DPM 2007 Prerequisites

    Installing System Center Data Protection Manager (SCDPM) 2007 on Windows Server 2008 Step-by-Step Guide

    This article outlines the step-by-step procedure to install System Center Data Protection Manager (SCDPM) on Windows Server 2008. As with many products, there are a couple of tricks to ensure a successful installation and SCDPM requires a few Windows Server 2008 features to be enabled before it all goes smoothly.

    Introduction

    System Center Data Protection Manager 2007 is a member of the Microsoft System Center family of management products, which are designed to help IT Professionals manage their Windows Server infrastructure. SCDPM 2007 sets a new standard for Windows backup and recovery—delivering continuous data protection for Microsoft application and file servers to a seamlessly integrated secondary disk and tape solution on the SCDPM server.  DPM enables rapid and reliable recovery through advanced technology for enterprises of all sizes.

    This article will demonstrate how to install System Center Data Protection Manager (SCDPM) 2007 on a Windows Server 2008.

    How to Install SCDPM - SCDPM Installation Prerequisites

    Although Microsoft has a prescribed way to install SCDPM (http://technet.microsoft.com/en-us/library/bb808735.aspx) I've found that it doesn't always go according to plan; leaving me with an installation which doesn't work as designed or a completely failed installation.

    Installing Required Windows Server 2008 Features

    Follow these steps to install all the required Windows Server 2008 features:

    • Click Start > Administrative Tools, and then click Server Manager.
    • Expand the Server Manager to the Features node, and then select Features
    • In the Features pane, click Add Features
    • Select Windows PowerShell and click Next
    • On the Confirm Installation Selection dialog, click Install
    • Click Start > Administrative Tools, and then click Server Manager
    • Expand the Server Manager to the Roles node, and then select Roles
    • In the Roles pane, click Add Roles 
    • On the Before You Begin dialog, click Next
    • On the Select Server Roles page, select Web Server (IIS). 
    • On the Add features required for Web Server (IIS)? Message box, click Add Required Features. On the Select Server Roles dialog, click Next
    • On the Web Server (IIS) dialog, click Next


    • On the Select Role Services dialog, ensure that the following are selected:
      • HTTP Redirection 


      • Application Development 
        • ASP.net 
        • .NET Extensibility 
        • ISAPI Extensions 
        • ISAPI Filters 
        • Server Side Includes


      • Security (Installed) 
        • Windows Authentication (Installed)


      • IIS 6 Management Compatibility 
        • IIS 6 Metabase Compatibility 
        • IIS 6 WMI Compatibility 
        • IIS 6 Scripting Tools 
        • IIS 6 Management Console


    • On the Select Role Services dialog, click Next
    • On the Confirm Installation Selections dialog, click Install
    • On the Installation Results dialog, click Close.
    Install Single Instance Store (SIS)

    Before installing DPM on any of the servers, it is very important to ensure that the Single Instance Store (SIS) is installed. SIS is a core requirement for SCDPM. The following procedure outlines the steps required to install SIS:

    • Click Start, click Run… 
    • In the Run dialog box. Type CMD.exe and press Enter
    • At the command prompt type the following and then press Enter.

      start /wait ocsetup.exe SIS-Limited /quiet /norestart
    • Restart the computer. 
    • To confirm that the installation was completed, check for the existence of the following registry key:

      HKEY_LOCAL_MACHINE\SYSTEM\CurrentControlSet\Services\SIS
    How to Install SCDPM - Step by Step

    The following steps show how to install SCDPM 2007 on the server:

    • Logon using a Domain Administrator account. 
    • Insert the DPM 2007 DVD in the CD drive, or if a virtual machine, attach the DPM ISO to the virtual machine. 
    • The installer should start automatically, if it does not, browse to the root of the DPM DVD and execute Setup.exe
    • On the installation dialog, click Install Data Protection Manager
    • On the Microsoft Software License Terms dialog, tick I accept the license terms and conditions and click OK
    • On the Welcome dialog, click Next
    • On the Prerequisites Check dialog, click Next
    • On the Product Registration dialog, enter DPM User in the User name field, and Company in the Company field. Click Next
    • On the Installation Settings dialog, accept the defaults and click Next
    • On the Security Settings dialog, enter a strong password and click Next. DPM Setup creates two restricted local user accounts, MICROSOFT$DPM$Acct which runs the SQL Server service and the SQL Server Agent service, and DPMR$DPM-01 which securely generates reports. 
    • On the Microsoft Update Opt-In dialog, select Use Microsoft Update when I check for updates (recommended) and click Next
    • On the Customer Experience Improvement Program dialog, select No, remind me later and click Next
    • On the Summary of Settings dialog, review the summary and click Install
    • On the Installation dialog, click Close
    • Restart the computer.
    SCDPM is now installed on the server.

    Install Latest Service Pack 1 (SP1) for SCDPM

    Service Pack 1 (SP1) includes a number of fixes which among other, are required for advanced Hyper-V support. Follow these instructions in order to install the service pack:


    • Install DPM SP1 pack by downloading the package from: http://www.microsoft.com/downloads/details.aspx?FamilyId=8AE5EDAC-4DE8-44E0-A6F9-8AFBB3E23585&displaylang=en

      SP1 consists of three files:
      • DataProtectionManager2007-KB959605.exe 
      • DPMManagementShell2007-KB959605.msp 
      • SqlPrep-KB959605.msp


    • Install the SP1 rollup package on the server that is running Data Protection Manager 2007. To do this, run the DataProtectionManager2007-KB959605.exe file on the server. Note: You do not have to restart the server after you install the hotfix rollup package. 
    • Update the remote SQL Server installation that is hosting the DPMDB database. To do this, run the SqlPrep-KB959605.msp file on the computer that is running SQL Server. 


    • Update the protection agents on the DPM Administrator Console. There are two methods to update the protection agents on the protected computers:


      • Method 1: Update the protection agents from the DPM Administrator Console 
        • Open the DPM Administrator Console. 
        • Click the Management tab, and then click the Agents tab. 
        • Select a computer from the Protected Computer list, and then click Update on the Action pane. 
        • Click Yes in the dialog box, and then click Update Agents. 
        • As soon as you receive the Enter Credentials and Reboot option dialog box, enter you credentials, select the Manually restart the selected servers later option, and then click OK.

          Note:  You do not have to restart the computer to update the agent. This is why the Manually restart the selected servers later option was selected.


      • Method 2: Update the protection agents on the protected computers 


        • Obtain the update protection agent package from the "Data Protection Manager installation location\DPM\Agents\RA\2.0.8107.0" directory on the Data Protection Manager 2007 server. 
          • x86 update
            i386\ Language ID \DPMProtectionAgent2007_KB959605.msp 
          • x64 update
            amd64\ Language ID \DPMProtectionAgent2007_ KB959605.msp 
          • Run the appropriate DPMProtectionAgent2007_ KB959605.msp package on each protected computer. 
          • Open the DPM Administrator Console on the Data Protection Manager 2007 server. 
          • Click the Management tab, and then click the Agents tab. 
          • Select the protected computers, and then verify that the agent version is listed as 2.0.8107.0. 
          • Update the DPM Management Shell. To do this, run the DPMManagementShell2007-KB959605.msp file on all computers on which the DPM Management Shell is installed.


    Conclusion

    This article has demonstrated a field tested procedure for installing System Center Data Protection Manger 2007 on Windows Server 2008 and highlighted a number of steps which are sure to save you a lot of problems during the installation. With this knowledge, you are well informed on how to install SCDPM in your enterprise.

    References

    Installing DPM

    System Center Data Protection Manger 2007 – Overview